Project settings
Enterprise
Many settings are only available in Label Studio Enterprise Edition. If you're using Label Studio Community Edition, see Label Studio Features to learn more.
General
Use these settings to specify some basic information about the project.
| Field | Description |
|---|---|
| Workspace | Select a workspace for the project. |
| Project Name | Enter a name for the project. |
| Description | Enter a description for the project. |
| Color | You can select a color for the project. The project is highlighted with this color when viewing the Projects page. |
| Proxy Credentials | Enter proxy credentials. These might be necessary if your task data is protected with basic HTTP access authentication. For example, if your Label Studio instance needs to access the internet through a corporate proxy server. |
Labeling interface
The labeling interface is the central configuration point for projects. This determines how tasks are presented to annotators.
For information on setting up the labeling interface, see Labeling configuration.
Annotation
Use these settings to configure what options annotators will see and how their labeling tasks are assigned.
- Instructions
-
Specify instructions to show the annotators. This field accepts HTML formatting.
Enable Show before labeling to display a pop-up message to annotators when they enter the label stream. If disabled, users will need to click the Show instructions action at the bottom of the labeling interface.
- Distribute Labeling Tasks
-
Select how you want to distribute tasks to annotators for labeling.
Field Description Auto Annotators are automatically assigned to tasks, and the option to manually assign annotators is disabled. Automatic assignments are distributed to all users with the Annotator role who are project members
You can further define the automatic assignment workflow in the Quality settings.Manual You must manually assign annotators to tasks. Annotators are not be able to view any labeling tasks until they have those tasks manually assigned to them. - Skip Queue
-
Select how you want to handle skipped tasks. To disallow skipped tasks, you can hide the Skip action under the Annotating Options section (see below).
Field Description Requeue skipped tasks back to the annotator
If an annotator skips a task, the task is moved to the bottom of their queue. They see the task again as they reach the end of their queue.
If the annotator exits the label stream without labeling the skipped task, and then later re-enters the label stream, whether they see the task again depends on how task distribution is set up.
- Auto distribution: Whether they see the task again depends on if other annotators have since completed the task. If the task is still incomplete when the annotator re-enters the labeling stream, they can update label and re-submit the task.
- Manual distribution: The annotator will continue to see the skipped task until it is completed.
Skipped tasks are not marked as completed, and affect the Overall Project Progress calculation visible from the project Dashboard. (Meaning that the progress for a project that has skipped tasks will be less than 100%.)
Requeue skipped tasks to others
If an annotator skips a task, the task is removed from their queue and assigned to a different annotator.
After skipping the task and completing their labeling queue, the annotator cannot return to the skipped task. How the skipped task is completed depends on how task distribution is set up.
- Auto distribution: The task is automatically assigned to another annotator.
- Manual distribution: The skipped task must be manually assigned to another annotator to be completed.
If there are no other annotators assigned to the task, or if all annotators skip the task, then the task remains unfinished. Skipped tasks are not marked as completed, and affect the Overall Project Progress calculation visible from the project Dashboard. (Meaning that the progress for a project that has skipped tasks will be less than 100%.)
Ignore skipped
How this setting works depends on your labeling distribution method.
Auto distribution: If an annotator skips a task, the task is marked as completed and removed from the annotator’s queue.
If task overlap (as defined in Annotations per task minimum) is set to 1, then the skipped task is not seen again by an annotator. However, if the overlap is greater than 1, then the task is shown to other annotators until the minimum annotations are reached.
Manual distribution: If the annotator skips a task, it is removed from their queue. But other annotators assigned to the task will still see it in their queue.
For both distribution methods, Ignore skipped treats skipped tasks differently when it comes to calculating progress.
Unlike the other skip queue options, in this case skipped tasks are marked as Completed and do not adversely affect the Overall Project Progress calculation visible from the project Dashboard. (Meaning that the progress for a project that has skipped tasks can still be 100%, assuming all tasks are otherwise completed.)
- Annotating Options
-
Configure additional settings for annotators.
Field Description Show Skip button Use this to show or hide the Skip action for annotators. Allow empty annotations This determines whether annotators can submit a task without making any annotations on it. If enabled, annotators can submit a task even if they haven’t added any labels or regions, resulting in an empty annotation. Show the Data Manager to annotators When disabled, annotators can only enter the label stream. When enabled, annotators can access the Data Manager, where they can select which tasks to complete from the Data Manager list.
However, some information is still hidden from annotators and they can only view a subset of the Data Manager columns. For example, they cannot see columns such as Annotators, Agreement, Reviewers, and more.Reveal pre-annotations interactively When enabled, pre-annotations are not automatically displayed to an annotator. Instead, annotators can choose when to reveal these pre-annotations as they work on the task, providing them with the opportunity to first assess the image or text without the influence of the model’s predictions. Annotators must leave a comment on skip When enabled, annotators are required to leave a comment when skipping a task. - Live Predictions
-
If you have an ML backend or model connected, you can use this setting to determine whether tasks should be pre-labeled using predictions from the model. For more information, see Integrate Label Studio into your machine learning pipeline.
Use the drop-down menu to select the predictions source. For example, you can select a connected model or a set of predictions.
- Task Sampling
-
Configure the order in which tasks are presented to annotators.
Field Description Uncertainty Sampling This option is for when you are using a machine learning backend and want to employ active learning. Active learning mode continuously trains and reviews predictions from a connected machine learning model, allowing the model to improve iteratively as new annotations are created.
When Uncertainty Sampling is enabled, Label Studio strategically selects tasks with the least confident, or most uncertain, prediction scores from your model. The goal is to minimize the amount of data that needs to be labeled while maximizing the performance of the model.Sequential Sampling Tasks are shown to annotators in the same order that they appear on the Data Manager. Uniform Sampling Tasks are shown in random order.
Review
Use these settings to configure what options reviewers will see.
- Instructions
-
Specify instructions to show the reviewers. This field accepts HTML formatting.
Enable Show before reviewing to display a pop-up message to reviewers when they enter the label stream. If disabled, users will need to click the Show instructions action at the bottom of the labeling interface.
- Reviewing Options
-
Configure additional settings for reviewers.
Field Description Mark task as reviewed after it has at least 1 accepted annotation
In a task where multiple annotators submitted labels, the reviewer only needs to accept one to consider the task reviewed.
Mark task as reviewed after all annotations are processed
In a task where multiple annotators submitted labels, the reviewer needs to accept or reject annotations submitted by all annotators.
Review only manually assigned tasks
If enabled, a reviewer can only see tasks to which they’ve been assigned. Otherwise, they can view all tasks that are ready for review.
Show only finished tasks in the review stream
If enabled, a reviewer only sees tasks that have met the Annotations per task minimum threshold.
Note that in most cases, skipped tasks do not contribute towards meeting the minimum.
Show the Data Manager to reviewers
When disabled, reviewers can only enter the review stream. When enabled, reviewers can access the Data Manager, where they can select which tasks to review.
However, some information is still hidden from reviewers and they can only view a subset of the Data Manager columns. For example, they cannot see columns such as who the other Reviewers are.
Requeue rejected tasks back to annotators
Rejected tasks are reassigned back to the annotator.
Reviewers must leave a comment on reject
When rejecting a task, the reviewer must leave a comment.
Show agreement to reviewers in the Data Manager
If reviewers can view the Data Manager, this setting controls whether they can access the Agreement column.
Quality
Use these settings to determine task completeness and agreement metrics.
- Overlap of Annotations
-
note
Overlap settings only apply when the project is using Auto distribution mode. If you are using Manual distribution mode, all tasks must be manually assigned - meaning that you are also manually determining overlap.
By default, each task only needs to be annotated by one annotator. If you want multiple annotators to be able to annotate tasks, increase the Annotations per task minimum.
Us the slider below this field to indicate how the overlap should be enforced. For example, if you want all tasks to be annotated by at least 2 annotators:
- Set the minimum number of annotations to 2
- Enforce the overlap for 100% of tasks.
If you want at least half of the tasks to be annotated by at least 3 people:
- Set the minimum number of annotations to 3
- Enforce the overlap for 50% of tasks.
The following options supersede what you specified under Annotations > Task Sampling.
Field Description Show tasks with overlap first If your overlap enforcement is less than 100% (meaning that only some tasks require multiple annotators), then the tasks that do require multiple annotations are shown first.
If your overlap is 100%, then this setting has no effect.Show tasks with ground truth labels first Prioritize tasks that already have a ground truth label. - Task Agreement
-
When multiple annotators are labeling a task, the task agreement reflects how much agreement there is between annotators.
For example, if 10 annotators review a task and only 2 select the same choice, then that task would have a low agreement score.
You can customize how task agreement is calculated and how it should affect the project workflow. For more information, see Task agreement and how it is calculated.
Field Description Agreement metric
Select the metric that should determine task agreement.
Low agreement strategy
You can set a low agreement strategy to ensure that a task is not marked complete until it meets 1) the required overlap and 2) a minimum agreement level.
Do nothing - Tasks with a low agreement can be marked complete; no additional actions are taken.
Assign additional annotator - Automatically assign an additional annotator to tasks with low agreement.
Note that your project must be set up to automatically distribute tasks.
Desired agreement threshold
Enter the agreement threshold as a percentage (1-100) that a task must have before it can be considered complete.
Maximum additional annotators
Enter a maximum number of annotators that can be automatically assigned to the task. If left blank, there is no limit to additional annotators.
Annotators are assigned one at a time until the agreement threshold is achieved.
note
When configuring Maximum additional annotators, be mindful of the number of annotators available in your project. If you have fewer annotators available than the sum of Annotations per task minimum + Maximum additional annotators, you might encounter a scenario in which a task with a low agreement score cannot be marked complete.
- Custom weights
-
Set custom weights for labels to change the agreement calculation. The options you are given are automatically generated from your labeling interface setup.
Weights set to zero are ignored from calculation.
Members
Use this page to control which users are project members.
Project members have access to published projects, depending on the permissions associated with their role. For more information, see User roles and permissions.
Some users cannot be added or removed from the Members page at the project level. These users include administrators, who already have access to every project (outside of the Sandbox). This also includes users who have been added as members to the Workspace. Workspace membership is inherited by the projects within the workspace.
If you have Auto distribution enabled, users with the Annotator role are automatically assigned tasks when they are added as members. Similarly, by default, project members with the Reviewer role are able to begin reviewing annotations once the tasks are labeled.
If you have Manual distribution enabled, you need to add users with the Annotator role as project members before you can assign them to tasks. And if you have Review only manually assigned tasks enabled, the users with the Reviewer role must also be project members before they can be assigned to tasks.
Project-level roles
Project-level roles are Annotator and Reviewer.
Users with these roles have their access constrained to the project level (meaning they cannot view organization-wide information and can only view project data when added to a project and assigned tasks). For more information, see User roles and permissions.
For Annotators and Reviewers, you can change their default role on a per-project basis to suit your needs. For example, a user can be assigned as an Annotator to “Project 1” and as a Reviewer to “Project 2.”
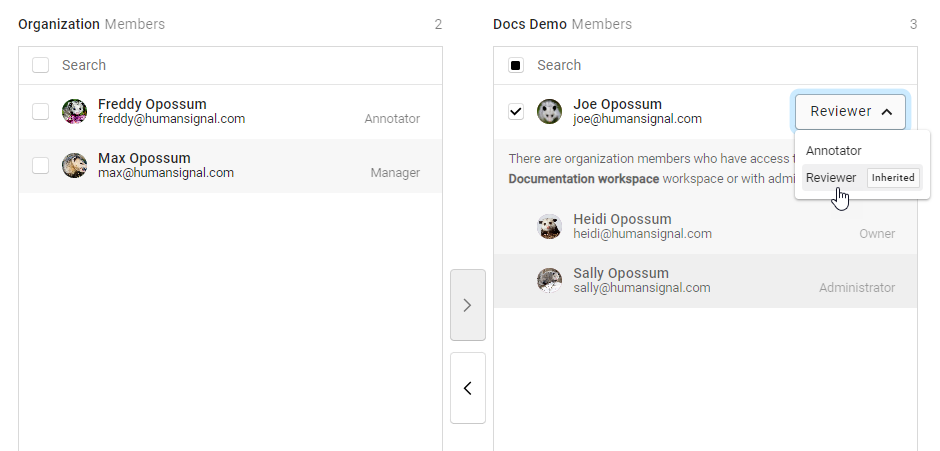
To assign a project-level role, first add the person to your project. Once added, you can use the drop-down menu to change their role:
note
This is only available for users who have the Annotator or Reviewer role applied at the organization level. Users with Manager, Administrator, and Owner role cannot have their permissions downgraded to Annotator or Reviewer on a per-project basis.
Model
Click Connect Model to connect a machine learning (ML) backend to your project. For more information on connecting a model, see Machine learning integration.
You have the following configuration options:
| Field | Description |
|---|---|
| Start model training on annotation submission | Triggers the connected ML backend to start the training process each time an annotation is created or updated. This is part of an active learning loop where the model can be continuously improved as new annotations are added to the dataset. When this setting is enabled, the ML backend’s fit() method is called, allowing the model to learn from the most recent annotations and potentially improve its predictions for subsequent tasks. |
| Interactive preannotations | (Available when creating or editing a model connection) Enable this option to allow the model to assist with the labeling process by providing real-time predictions or suggestions as annotators work on tasks. In other words, as you interact with data (for example, by drawing a region on an image, highlighting text, or asking an LLM a question), the ML backend receives this input and returns predictions based on it. |
And the following actions are available from the overflow menu next to a connected model:
| Action | Description |
|---|---|
| Start Training | Manually initiate training. Use this action if you want to control when the model training occurs, such as after a specific number of annotations have been collected or at certain intervals. |
| Send Test Request | (Available from the overflow menu next to the connected model) Use this for troubleshooting and sending a test resquest to the connected model. |
| Edit | Edit the model name, URL, and parameters. For more information, see Connect a model to Label Studio. |
| Delete | Remove the connection to the model. |
Predictions
From here you can view predictions that have been imported or generated when executing the Batch Predictions action from the Data Manager. For more information on using predictions, see Import pre-annotated data into Label Studio.
Cloud storage
This is where you connect Label Studio to a cloud storage provider:
- Source Cloud Storage–This is where the source data for your project is saved. When you sync your source storage, Label Studio retrieves data to be annotated.
- Target Cloud Storage–This is where your annotations are saved. When you sync your target storage, annotations are sent from Label Studio to the target storage location.
For more information, see Sync data from external storage.
Webhooks
You can use webhooks to integration third-party applications. For more information, see Set up webhooks in Label Studio and our integrations directory.
Danger Zone
From here, you can access actions that result in data loss, and should be used with caution.
Reset Cache
Reset the labeling cache. This can help in situations where you are seeing validation errors concerning certain labels – but you know that those labels do not exist.
Drop All Tabs
If the Data Manager is not loading, dropping all Data Manager tabs can help.
Delete Project
Deleting a project permanently removes all tasks, annotations, and project data from Label Studio.