Manage user accounts
note
If you are using SSO/SAML or SCIM, you can map groups to roles on the organization level and the project level. For more information, see Set up SSO authentication for Label Studio and Set up SCIM2 for Label Studio.
If you are using an IdP with SCIM or SAML/SSO, you should also handle user deactivations and deletions from the IdP.
Assign roles to users
If you invite users using the invite link option, their account is created but must be activated by assigning them to a role.
Tip
You can use the role filter above the table to see all Pending users. Select the Not Activated role.
Open Label Studio and click the menu in the upper left.
Select Organization.
If you do not see the Organization option, you do not have access to the Organization page. Only users in the Owner or Administrator role can access this page.
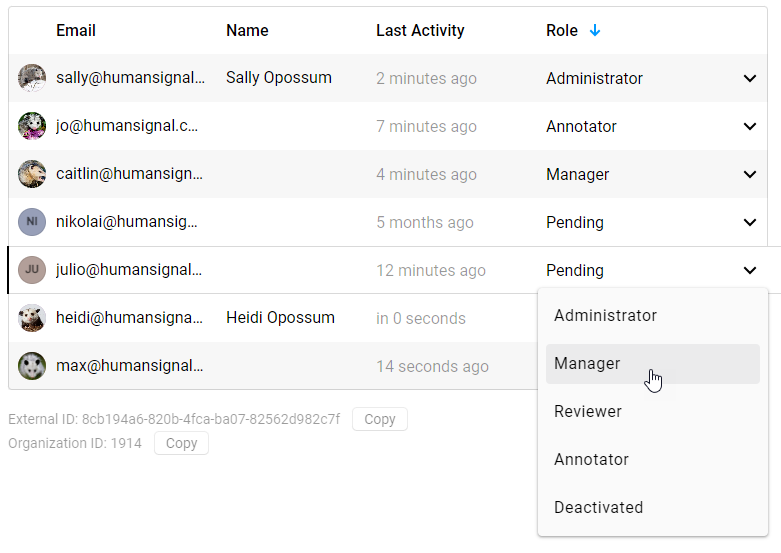
Locate the user account to which you are assigning a role.
Use the drop-down menu next to the user to select a role.
Programmatically assign roles
To programmatically activate and assign roles to users, you can use the API.
For a given user ID and a given organization ID, you can programmatically assign a role to a user by sending a POST request to the /api/organizations/{id}/memberships endpoint. See the Organizations API documentation.
Determine the organization ID or user ID
If you’re not sure what the organization ID is, you can do the following:
- If you only have one organization in your Label Studio instance, use
0. - If you have multiple organizations, make a GET request to the
/api/organizations/endpoint.
To retrieve user IDs for the members of an organization, make a GET request to /api/organizations/{id}/memberships.
Deactivate users
You can deactivate a user account by assigning them to the Deactivated role. Deactivating a user revokes their access and opens up their seat in your license.
You can reactivate a user by assigning them to an active user role.
Delete users
From the Organization page, select the user you want to delete.
Click Delete.
A confirmation message appears. Click Delete Member.
Once deleted, any completed work or changes that the user made will appear as belonging to a “Deleted User.”
If you want to add the user again at a later date, you will need to re-invite them to the organization.