Named Entity Recognition
If you want to perform named entity recognition (NER) on a sample of text, use this template. This template supports overlapping text spans and very large documents.
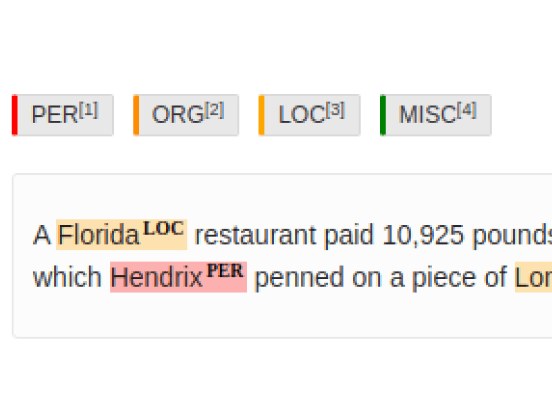
Interactive Template Preview
Labeling Configuration
<View>
  <Labels name="label" toName="text">
    <Label value="PER" background="red"/>
    <Label value="ORG" background="darkorange"/>
    <Label value="LOC" background="orange"/>
    <Label value="MISC" background="green"/>
  </Labels>
  <Text name="text" value="$text"/>
</View>
About the labeling configuration
All labeling configurations must be wrapped in View tags.
Use the Labels control tag to specify the relevant NER labels to apply to various text spans:
<Labels name="label" toName="text">
    <Label value="PER" background="red"/>
    <Label value="ORG" background="darkorange"/>
    <Label value="LOC" background="orange"/>
    <Label value="MISC" background="green"/>
</Labels>
Use the background parameter with the Label control tag to specify a CSS color for the label.
Use the Text object tag to specify the text data:
<Text name="text" value="$text"/>Enhance this template
You can enhance this template in many ways.
Display labels on the left
If you want to modify the appearance of the labeling interface, you can use styling on the View tag. In this example, display the NER labels to the left of the text to be labeled.
Start by setting the entire labeling interface display to flex:
<View style="display: flex;">Then use a different View tag to wrap the labels. Because the labels are listed before the text, they appear
on the left side of the interface.
<View style="width: 250px; margin-right: 1em; padding: 1em; background: #343c7f;">The styling on this tag sets a width for the section of the interface with the labels, adds a right margin between the labels and the text, adds padding around the labels, and a background color for this section of the interface.
Then you can add the Labels control tag like usual to display the NER labels:
<Labels name="label" toName="text" showInline="false">
  <Label value="PER" background="red"/>
  <Label value="ORG" background="darkorange"/>
  <Label value="LOC" background="orange"/>
  <Label value="MISC" background="green"/>
</Labels>
Close the View tag with the Labels, and open a new one for the Text tag:
</View>
<View>
The Text object tag specifies the text to label:
<Text name="text" value="$text"></Text>Then you can close the two remaining View tags.
Enforce word alignment
If you want to allow annotations of only full words and enforce word alignment in labeling tasks, you can use the granularity parameter on the Text object tag to make sure that all highlighted spans in a NER task are complete words.
For example, adjust your Text tag like follows:
<Text name="text" value="$text" granularity="word" />Add context to specific NER spans
If you want to add context to specific NER spans, you can set up conditional per-region labeling with your NER template.
For example, prompt annotators to choose the relevance of every text span in the text sample is:
<Choices name="relevance" toName="text" perRegion="true">
    <Choice value="Relevant" />
    <Choice value="Non Relevant" />
</Choices>
The perRegion parameter means that these choice options apply for each text span region.
You can also combine the View tag and the perRegion parameter of the Rating control tag to prompt annotators to rate their confidence in the accuracy of each individual text span region:
<View visibleWhen="region-selected">
    <Header value="Your confidence" />
</View>
<Rating name="confidence" toName="text" perRegion="true" />
The visibleWhen parameter with the View tag means that when a specific region is selected, the Header appears, prompting the annotator to supply a rating that applies to that region.
Filter a long list of labels
If you want to filter a long list of labels, add the Filter tag to your labeling configuration. For example, to filter the named entity recognition labels, add the following:
<Filter name="filter" toName="label" hotkey="shift+f" minlength="1" />
<Labels name="label" toName="text" showInline="false">
    <Label value="PER" background="red"/>
    <Label value="ORG" background="darkorange"/>
    <Label value="LOC" background="orange"/>
    <Label value="MISC" background="green"/>
</Labels>
The toName parameter on the Filter tag references the name parameter for the Labels tag. You can also specify a hotkey to use for the filter text box, and set the minlength parameter to specify the minimum number of characters typed into the filter before the list of labels is filtered.